

Photo by Florian Krumm on Unsplash
How to Launch Your First EC2 Instance on AWS: A Step-by-Step Guide


Amazon Web Services (AWS) is a leading cloud platform, offering scalable computing resources like virtual servers (EC2 instances). Launching your first instance might seem daunting, but this guide simplifies the process. Let’s get started!
EC2 is one of the most popular of AWS’ offering
• EC2 = Elastic Compute Cloud = Infrastructure as a Service
• It mainly consists in the capability of :
• Renting virtual machines (EC2)
• Storing data on virtual drives (EBS)
• Distributing load across machines (ELB)
• Scaling the services using an auto-scaling group (ASG)
Step 1 : Create an AWS Account
Go to AWS Free Tier.
Click Create a Free Account and follow the prompts.
Add payment details (required for verification, but free-tier usage won’t incur charges).
You’ll be able to access you Management console after you’ve logged in as shown below.Depending on your Region.

Step 2 : Navigate to EC2
Log into the AWS Management Console.
In the search bar, type EC2 and select EC2 under Services.
The EC2 dashboard will look like below

Step 3 : Launch an EC2 Instance
Click “Launch Instance”
This opens the instance creation wizard.Nae it anything you would like for my case ‘My First Instance‘Choose an Amazon Machine Image (AMI)
Select a free-tier eligible option like Amazon Linux 2023 AMI or Ubuntu Server.Provided its a free tier os image.

Step 4: Select an Instance Type
For testing, pick t2.micro (free-tier eligible).
Click Next: Configure Instance Details.

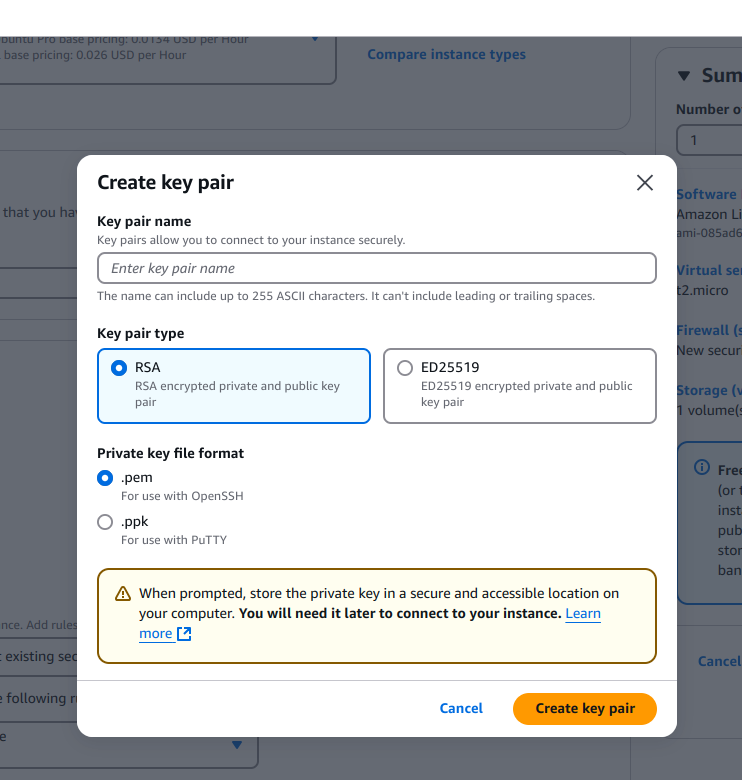
Step 5 : Select or Create a Key Pair
Choose Create a new key pair, name it (e.g.,
my-key-pair), and download the.pemfile.Store this file securely—it’s required for SSH access.To Remotely access the server using our host machine using the Command Line Interface.

Step 6 : Select or Create a Key Pair
Choose Create a new key pair, name it (e.g.,
my-key-pair), and download the.pemfile.Store this file securely—it’s required for SSH access.To Remotely access the server using our host machine using the Command Line Interface.
Step 7: Configure Security Group
Create a new security group to control traffic.
Allow SSH access (port 22) for connecting to the instance.
Also Allow HTTP traffic fro the internet

Step 8: Add Storage
- The default 8GB (free-tier) is sufficient.Leave the default settings.

Step 9: Add User Data Script.
An EC2 user data script allows you to automate tasks when launching an instance, such as installing software, configuring settings, or running custom commands.
Bootstrapping means launching commands when a machine starts.That script is only run once at the instance first start
Scroll to the Advanced Details section and scroll to the bottom.Paste your script into the User Data field.

Sample EC2 User Data script You can use
#!/bin/bash
# Use this for your user data (script from top to bottom)
# install httpd (Linux 2 version)
yum update -y
yum install -y httpd
systemctl start httpd
systemctl enable httpd
echo "<h1>Hello World from $(hostname -f)</h1>" > /var/www/html/index.html
Step 10 : Review and Launch
Confirm settings, then click Launch.
Step 11 : Connecting to your Instance in the Browser
After the instance is running as shown below we will connect to it in the browser.
Select the instance and go to the Networking Tab below.

In the Networking tab,you’ll see public Ipv4 Network address
Select the open address and assign it http:// then you instnce ip address

http://3.80.60.86 based on your public ip you’ll be able to see this.
This reply seen below is as a result of the user script
echo "<h1>Hello World from $(hostname -f)</h1>" > /var/www/html/index.html

Conclusion
Congratulations! You’ve launched your first EC2 instance. Remember to always use AWS Budgets to monitor costs.
Happy Coding 😊!!